Showing posts with label Asian. Show all posts

Sunday, November 27, 2011

Kerisik (Toasted Coconut)

This year has been a year of a few firsts in my culinary adventures. It includes my first attempt at making kerisik. The result? It was successful. Yey!

Well, why did I make my own kerisik?
Because I wanted to make rendang for the very 1st time in my life, and 1 of the ingredients for rendang is kerisik. May I add that kerisik is an essential ingredient in rendang, very very important as without kerisik, what is rendang.

But why didn't I just get the ready-made kerisik from the stores?
Because I was so geared to be in front of the stove for ~6hrs, to toast the grated coconut to a lovely golden brown. Indeed, I was so gung-ho~. No regrets. And also, ready-made ones may not be as tasty and sometimes they do have a certain undesirable aroma after being packed for a while.

I can't quite remember now how much coconut I bought from the wet market but I think it'd have to be at least 1 whole coconut. We need to use the old coconut not the young coconut as young coconut is sweeter and less aromatic than the old one. The young coconut are the full-whites when grated and are used for malay kuih like kuih kasui, lopis and the likes.

In a wok, i used anodized wok, stir coconut repeatedly and frequently, with slow fire. Since it was my first attempt, I was very careful with the fire. I think it wasn't slow fire but *very* slow fire. :P
It should gradually changed colour from white to light brown and to a golden brown like these:

Fresh coconut at the beginning of it all. I also added a tablespoon of coriander seeds to the coconut.

changes to light brown, after approximately 3 hours

becomes more brown

finally to a golden brown, after close to 6 hours, with slow fire.

Then, using the miller, blend the golden brown coconut


Golden brown in miller and dark brown after milling on the right. The oil that was released from the milling changed it to dark brown.


Can be stored in airtight container and frozen. Just what I did.

And with the kerisik, I made my rendang for the very first time, for Eid this year:

Beef Rendang

The husband gave his thumbs-up for my very first rendang and that was enough for me.

The 6 hours of kerisik? It was all worth it.

:)


Tuesday, May 3, 2011

Sushi

With the recent natural calamity that has enveloped Japan, my heart sincerely goes out to the nation, the people and the victims of the beautiful land. One thing that the world has learnt about Japan is their stoicism, civility, courage and discipline even in the face of disaster, the magnitude of it beyond anyone's imaginations, ever.

Needless to say, the Japanese's courage in the face of adversity have earned eternal respect from the world over. And it's with hope that they'll rise once again, for they are the one and only, the Land of the Rising Sun. Let's continue to pray for Japan and its people.

Here's a tribute to 1 of the most-loved Japanese dish (it's origins isn't from Japan though), a nutrition-packed one-dish meal, the sushi.

Ingredients

Sushi Rice:
1 cup of Japanese sushi rice grains (California rice)
1 cup of water

Method for cooking sushi rice:
- Soak the rice for 30 minutes before cooking
- Cook as how u’d cook normal rice i.e. 1 cup of rice grains : 1 cup of water.
- 1 cup of rice grains would yield 3 rolls of sushi. So if u intend to make more rolls, just cook the rice proportionately.
- When rice is cooked, leave it to cool (not cold) before mixing in the sushi rice vingear evenly. Rice needs to be warm to absorb the rice vingear.
- You need about 1 cup of cooked rice for each roll.
- Use a wooden or plastic spoon so that rice does not stick while mixing or scooping.

Sushi Rice Vinegar:
1/2 cup rice vinegar
4 tbsp sugar
1 tsp salt
1/2 tsp soya sauce
*OR just use ready mixed sushi rice vinegar
(200ml for 3 cups of rice. so if 1 cup of rice it will be approximately 70ml of rice vinegar)

Method for sushi rice vinegar:
-Mix all the ingredients for sushi rice vinegar, boil over low heat till salt and sugar dissolve then leave to cool.

Dressings/Dip Recipes:

i. Yoghurt with Tomato Paste(1 portion serving)

3 tbsp Natural Yoghurt
1/2 – 1tbsp tomato paste

ii.Mayonnaise with orange juice(1 portion serving)

3 tbsp mayonnaise
1/2 – 1tbsp orange juice (Best to use concentrated juice)

For both of these dressings, blend well till mixture is smooth. Dressing can be spread on rice before putting other ingredients like crabmeat, eggs, etc. Can also be used as the dip.


place the rolling mat first, then a piece of plastic/baking sheet on the rolling mat then nori (seaweed)
nori-matt surface on top and in landscape position
before rolling


spread the rice over 2/3 of nori, no need to seal the air gap after spreading the rice. then spread the dressing that u'd like eg. wasabi or yoghurt or mayonnaise dressing.


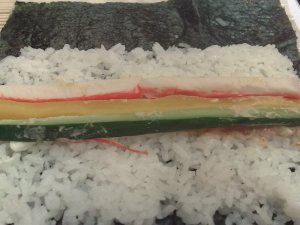
next, the ingredients on the rice, u can basically use anything. here, i used the standard crab roll, japanese cucumber and pickled radish.


Roll the mat once over to the other end of the rice.and pull the mat at the opposite side tightly to give the sushi its shape

california maki

ready to be served

or perhaps, u'd prefer tuna roll. :)

Additional and educational information:

1.Nori(Seaweed) is an excellent source of iodine, calcium and iron, all 3 which are important in maintaining a healthy blood and bone structure. It is also rich in vitamins A, B12, and D, which is otherwise present only in animal products.

2.Vinegar has the power to alter proteins and destroy bacteria. Adding sugar to sushi rice vinegar prevents the acidic vinegar taste from being too dominant.

3. Soy sauce is highly recommended as a natural fermented food and is better than salt, sugar or synthetic seasonings.

4. Pickled Ginger(Gari or Shoga) is eaten to refreshen your mouth between 2 pieces of sushi.

5. Horseradish(Wasabi) helps to bring out the flavour of the sushi. Do not use too much wasabi because it numbs the palate and conceals the subtle flavour of the food. Wasabi is an excellent source of Vitamin C.

6. Green tea is the most appropriate drink with sushi. It removes the aftertaste and freshens the mouth for the next serving.

7. Nori wrapped sushis should be eaten first since the crispness of nori does not last long once it comes in contact with moisture, which explains why the rice needs to be cooled first before spreading on nori to retain a certain degree of crispiness of the nori.

Nutrition experts regard sushi as a well-balanced, healthy food because it contains many nutrients including minerals and vitamins which would otherwise be partially lost while cooking.

Wednesday, March 9, 2011

Sotong Masak Hitam (Squid in Black Ink)


This is 1 very asian, very traditional 'kampung' (village) dish that we adore.
While I'm not a crustacean fan, I love sotong (squids) and cuttlefish; sambal sotong kering, cumi-cumi are my favourites too.

And although I'm very much an urban-city dweller, because I have no kampung (sob sob!), I grew up with kampung food, thanks to my mom. Now, who can resist 'urap' (raw salad), 'ulam' sambal belachan and the likes. I can't! And sotong hitam is another I-can't-resist-dish.

There are many ways of cooking sotong hitam. This is how I do it:

Ingredients:

500g of squid - to keep the ink pouches.

1 tsp fennel seeds - dry roast and crushed
1 tsp whole black pepper - dry roast and crushed
2 stalks of lemon grass - bruised
1 red onion - sliced
1 tbsp of blended red onion
1 inch ginger - grated
2 garlics - grated
2 pieces of sliced dried tamarind (asam keping)
2 tbsps of tomato sauce
A cup of water, thereabout
Salt and sugar to taste.

1. Heat some oil.
2. Fry the sliced onions till translucent, then add the crushed fennel seeds and black pepper.
3. Add lemon grass. When fragrant, add the tbsp of blended onion, grated ginger and grated
garlic.
4. Fry for a while. Then add 2 tbsps of tomato sauce.
5. Add the squids. Followed by a cup of water, tamarind pieces and also the squids' ink.
6. Cook till gravy thickens. You can add a bit more water to dilute it if you think the gravy's too thick for you. .


It's too yummy when served with hot rice.

Wednesday, December 15, 2010

Chicken Curry

Chicken is our favourite poultry, like I've mentioned before. And Chicken curry is another favourite dish in the house. Why's that so? For a very simple reason - Because of its versatility. We can have it with baguette, normal white bread, rice and of course with our favourite roti jala too. Yum Yum!

For my curry, I don't use coconut milk. I used lotsa tomatoes though. The thing about cooking curry is you've to make sure that the oil separates properly and only then will your curry 'become' curry, if you get what I mean. If the oil doesn't separate, the taste is not quite there.


Here's my chicken curry recipe, and I cooked curry a lot. It's quite the staple dish at home. :P

Ingredients:
I whole chicken, cut into 8/12/14 pieces.

A)
2 big red onions - sliced thinly (I don't use yellow onions in my dishes. But spicy, huge red onions as they are packed with more flavour too).
2 ripened tomatoes - diced them up
3 cardamoms
1 cinnamon stick
4 cloves


B)
2 cloves of garlic - to blend it
1 cm old ginger - to blend it
1 tbsp tomato puree
Mint leaves - loading up on the mint leaves is a treat


C)
1 cup of water
2 potatoes, quartered
2 ripened tomatoes - quartered
2 fresh green chillis - halved


Half a packet of Baba's meat curry powder
coriander leaves - for garnishing

Method:
Fry A) till the sliced onions become translucent

Add in B) and fry thoroughly.

Add the chickens to the mix and cover the lid for around 3 minutes. Then, add half a packet of meat curry powder, mix thoroughly and cover the lid again for around 3 minutes or so, to allow the flavours to infuse through.

Then, add in C). Cover the lid and cooked till the oil separates and the potatoes become soft.
Garnish with some coriander leaves. Voila! The curry's done! :)

Mint leaves are essential as it enhances the curry flavour and gives an enticing aroma that's sure to whet ur appetite further. I've used curry leaves before but mint leaves are still the ones for me.

A gastronomical treat indeed. :)

Tuesday, November 30, 2010

Roti Jala


Since I was young, roti jala has always been one of my favourite dishes. I'd always look forward to devouring it either on its own, which is just as great, or with chicken curry. I love it with chicken curry more than any other curries.

I wouldn't be able to resist buying them if I see them too.

Of cos' when the love for such (food) is too strong, it's also proportionate to trying making it on my own, in my cooking and eating rules, as much as possible that is. :P


I went through a few recipes online and I noted the different variations to it; some used coconut milk, evaporated or fresh milk. I've never used milk in my roti jala recipe. Here's the very simple recipe that I have been using:


Ingredients:

  • 1 cup of plain flour
  • 1 cup of water
  • 1 medium or large size egg
  • a bit of yellow colouring or you can use a few dash of tumeric
  • some salt
  • some cooking oil

Method:

  • Mix all the above ingredients thoroughly. There should not be any lumps. You can either use a sieve to sieve through or blend the mixture in an electric blender to get a smooth mixture
  • Heat a non-stick pan and grease some oil onto it. Not too much or the roti jala will become too oily
  • Fill 1/4 of the roti jala mould with the mix and spiral it.
  • It cooks very fast, so you basically have to stand in front of your stove and get free sauna too.
  • Fold it into triangle. I usually put 2 pieces of the roti jala together before folding into triangles

Put a little bit of oil if the mixture doesnt flow out of the mould easily, if it has 'hiccups' you know. U need to use a little agar-ration here.

I usually triple the recipe above n it'll give me a good 20 to 24 pieces of roti jala (2 X roti jala for each before folding it into triangles).

It's a common dish to serve guests at my place. Also a hit with the hubster and little one. :)